How to Lock a File on SharePoint
Trustworthy's Family Operating System® automatically organizes your most important information and turns it into answers, guidance, and action.
Key Takeaways
SharePoint allows users to lock files to prevent unauthorized edits or downloads.
Locking files adds an extra layer of protection for sensitive or shared documents.
Following best practices can enhance file security and reduce the risk of misuse.

SharePoint is an excellent project management software with many great features. One of these is the ability to protect your important documents by utilizing the lock file functions.
So, how do you lock a file on SharePoint? This guide explains why you should consider locking your documents, walks you through how to do it, and provides some general best practices to help you utilize its features most effectively.
Why Should You Lock Files on Sharepoint?
Locking files on SharePoint can offer more protection for important documents. It allows certain restrictions to be placed on files, such as preventing edits, copying, downloading, or access to files from unauthorized users.
Locking files is also especially useful if you’re collaborating with other individuals. Sharing a file with someone increases the risk of someone stealing it or an unauthorized person gaining access. Setting restrictions will allow you to have more control of your files.
SharePoint offers all these benefits to its users. It has flexible project management features and offers security protection, ensuring nothing will be changed or compromised when collaborating with others.
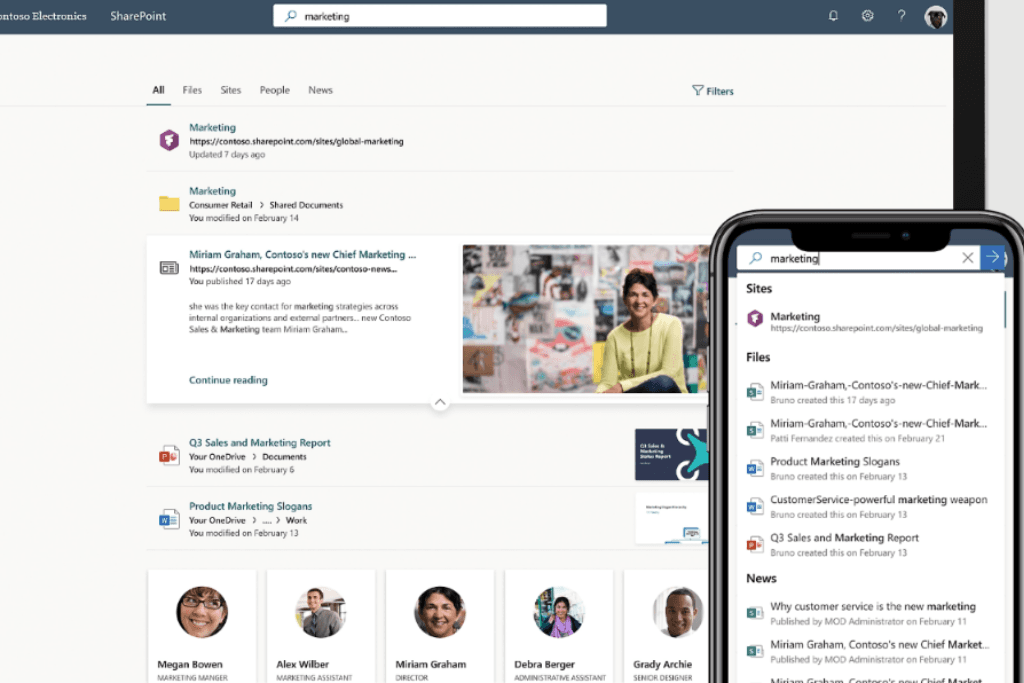
How to Lock a File on SharePoint
Using the lock file feature on SharePoint may be overwhelming if you’ve never used it before. Locking a file is relatively straightforward and becomes more simplified once you know the process. Here’s a detailed step-by-step guide on how to file lock on SharePoint.
Prerequisite: Upload the Document Onto SharePoint
If you haven't yet, you must upload the document you wish to file-lock onto SharePoint.
To share the file, log into the SharePoint website and click the “Documents” tab. After that, click “Upload” to select a file from your computer. Find the document, click on it, and click ‘Open” to begin uploading.
1. Add Permissions to the Document
When the file finishes uploading, you can add permissions to the file. This stage allows you to set who can see the document and restrict features such as editing, copying, and the number of users able to open it at a given time.
To add permissions to a document, click the “Library” tab and select the document you want to lock. On the file’s page, click the “Shared With” tab and then “Advanced.” A window will pop up where you can add permissions to the document.
2. Set the File Permissions
You can view a list of users and groups within the file permissions section. To lock the file, click “Add,” and then select the user or group you want to give full access to.
Permissions are modifiable. If you wish to add or remove users with access to the file, go back to this mode and remove those as you need.
3. Verify the Lock
Once you finalize the users or groups you want to allow access to, check and confirm the document is locked by verifying it. Double-checking that a document is locked is always a good idea.
To verify, click the “Shared With” button. The file is locked if it shows a list of permissions with groups and users. If it doesn't show that window, it means it isn’t locked and you will have to repeat the previous step until the permissions are added.
4. Remove Unwanted Permissions
As mentioned, you always have the ability to remove permissions. In cases where you worked with a former colleague and they’re no longer part of the project, it’s advisable to remove them from accessing it.
To do this, click “Shared With” and open the permissions window. Click the “Remove” button and confirm you want to remove the user or groups. Once you remove their name, they can no longer access the document.
5. Create a Version History
Creating a version is always recommended because you can restore it to a previous version if the document gets altered or deleted.
If you want to make a backup version of a document, click “Library” and select the file you want a version of. From the file’s page, click “Version History” and then click “Create a Version.” You should see a new version of the file.
However, to use the versioning feature, you must have versioning enabled. Even if you made a version of a document, it won’t be accessible until it’s turned on.
Enabling versioning is highly recommended. If you wish to do so, click the library tab and select the file you want to lock. When viewing the file’s page, click “Versioning Settings” and then click “Create Major and Minor Versions.”
How to Unlock Files in SharePoint
You also have the ability to unlock the document.
Common reasons for unlocking a file include:
To make changes or updates to a locked file.
The document is frozen due to an accidental lock, often caused by another user.
To enable other team members with necessary privileges and permissions to access the document for editing purposes.
To unlock a file, go to the library page and select the document you want unlocked. Click the document, go to its page, and then click the “ Unlock” tab. Hit confirm, and your file will be unlocked for anyone to access it.
Best Practices for Locking a File on SharePoint
SharePoint is a great resource for project management and security for your documents. However, you should consider some basic practices to get the most out of it. Below are some general tips on how to improve your experience.
Enable Appropriate File Permissions
When working on a collaborative project, you should consider what type of permissions should be used and what is practical based on their needs.
You should limit permissions to an important document only to those deemed necessary. If it's a document that a team of people needs to access regularly, those individuals should be able to access it more freely.
Users who don’t need to access the document regularly but need to for a specific situation should have their permissions limited and revoked later.
In addition, it’s recommended that you restrict editing and downloading of the document to prevent unauthorized distribution.
Communicate with Your Team
Communication is key when collaborating with other members. One reason is that it can prevent confusion and frustration.
Communication can help keep other team members accountable. Whenever someone makes an edit to the document, they should notify the team to prevent any unnecessary surprises.
If a team is editing the document, scheduling team members' edit times could be useful to avoid any clash of each other’s work.
It can also help improve security protocols. If someone were to access the document and if it triggered a notification to the owner, it could cause unnecessary panic.
Review and Update Permissions
Review document permissions from time to time. For security reasons, it’s highly encouraged to remove members who are no longer working on the project and those who no longer need the ability to access it.
Depending on the document’s sensitivity, you need to review it quite often to help protect the confidential information.
Frequently Asked Questions
How do I make a file non-editable in SharePoint?
To make a file non-editable in SharePoint, go to the library tab and select the document you wish to prevent editing. On the document’s page, click “Manage Permissions.” Within permissions, click “Edit Permissions” to set limits on certain users' editing capabilities.
Can you make files private in SharePoint?
Yes, it is possible to make files private in SharePoint. One way is not to share the document with other team members. If you aren’t sure if your document is private, go to the document’s page and click “Shared With.” If the permissions window pops up and shows users, your document is not private.
Can you prevent a file from being downloaded in SharePoint?
Yes, it is possible to restrict users from downloading a document. To do this, go to the document’s SharePoint page, click “Shared With,” and then “Permissions.”
When the document permission window opens, select the users or groups you wish to have a “Restricted View.” They can only view the document and can’t edit or download it.
How do I stop users from moving files on SharePoint?
To stop users from moving a document file, restrict them through the Permissions tab. View the document in SharePoint, click “Shared With,” and then go to the permissions section. Find the users or groups you want to be restricted, and enable “Restricted View.

We’d love to hear from you! Feel free to email us with any questions, comments, or suggestions for future article topics.